Why Google Merchant Center Guide is Matters for Beginners
Welcome to the Google Merchant Center Guide. If you’re just starting with online selling or want to show your products on Google, this guide is for you.
We’ll walk you through every step easy, clear, and without jargon.
You’ll learn how to set up your Google Merchant Center account, add your products, fix errors, and show your items in Google Shopping ads.
By the end, you’ll feel ready to run your own product feed and get more shoppers to your store. By following our Google Merchant Center Guide, you can increase traffic, drive more sales, and improve conversions.
This will lead to higher revenue and better results for your business.
This guide is made for:
- New online store owners
- Small businesses just getting started
- Digital marketers helping clients sell online
Why Use Google Merchant Center?
We guide how Google Merchant Center lets you show your products on Google. When someone searches for a product, they can see yours with a picture, price, and store name.
It helps people find your items fast, and that means more sales for you.
Benefits of Google Merchant Center include:
- More traffic to your store
- Showing up on Google Shopping and Search
- Better ad performance when connected with Google Ads
- Trusted platform with huge reach
💡 Quick Tip Before You Begin
Before setting up, make sure your website is ready. It should be live, have clear product pages, and include basic info like price and shipping. This helps avoid errors later and keeps your setup smooth.
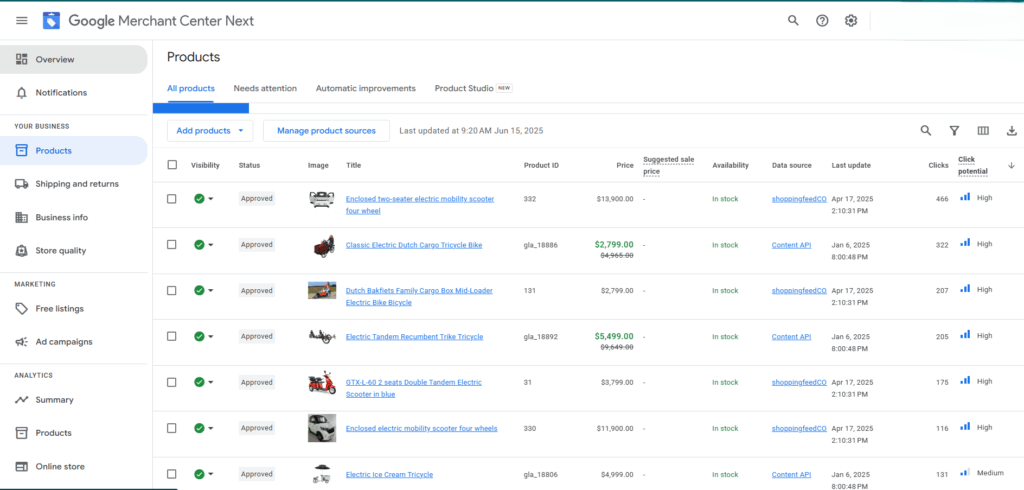
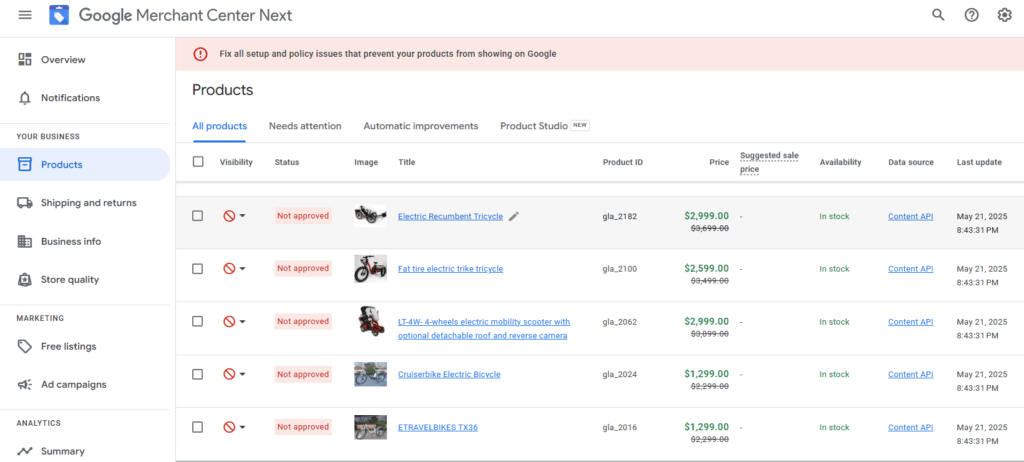
What Is Google Merchant Center?
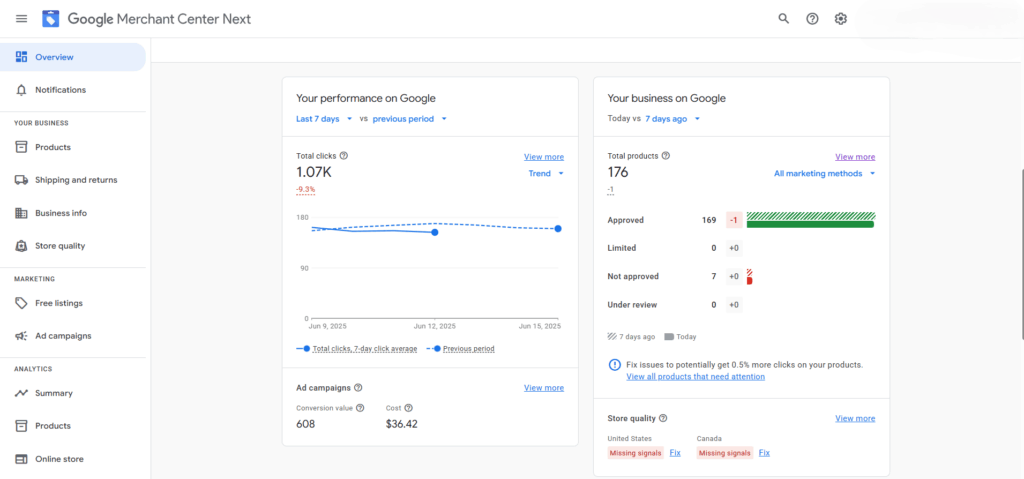
This is how the Google Merchant Center looks when you log in. It’s where Aussie sellers manage their product listings for Google Shopping.
Let’s make this simple. Google Merchant Center is a tool that helps you show your products on Google.
You add your items, and Google helps people see them when they search.
It’s like a big online shelf.
But instead of putting your products in a store, you put them into Google.
So when someone types “red shoes” or “best headphones,” your product can show up—along with the price, picture, and name of your store.
Our Google Merchant Center Guide explains common issues clearly and provides step-by-step solutions to resolve them efficiently.
Why GMC IS Important?
Because people trust Google.
Millions of people search for stuff to buy every day. If your product shows up in front of them, you have a better chance of getting a sale.
Google Merchant Center connects your products to Google Shopping ads, search results, and more. So it helps you reach real buyers, not just browsers.
What Can You Do With It?
With Google Merchant Center, you can:
- Add all your products in one place
- Show your products in Google Shopping results
- Run Google Shopping Ads (they look like product boxes on top of search results)
- Fix issues if something goes wrong with your product info
- Track your product performance
It’s not just for big companies. Small shops and beginners can use it too.
Real-Life Example (Easy to Understand)
Let’s say you sell custom water bottles. You upload your product info into Google Merchant Center—like name, price, and picture. Then, when someone types “custom water bottle for gym” on Google, your product can show up with other similar items.
If it looks good and the price is right, they click. That’s traffic and maybe a sale for you.
How to Set Up Google Merchant Center (Step-by-Step)
If you’re new to this, don’t worry. This step-by-step guide will walk you through how to set up Google Merchant Center the easy way.
Whether you’re a small store owner or just starting out online, this Google Merchant Center Guide for beginners will help you get things going fast.
Step 1: Create Your Google Merchant Center Account
Go to merchants.google.com and click “Get Started.”
You’ll need to sign in with your Google account. If you already use Gmail, you can use that. Choose the country where your business operates and your time zone.
Then, pick where you want your customers to check out:
- On your website
- On Google (for US-based stores)
- At your local store
This is your Google Merchant Center account setup step—super easy and free.
🟢 Tip: Use the same Google account you use for Google Ads. It makes linking later a breeze.
Step 2: Verify and Claim Your Website
Next, Google needs to know that you own your website.
Here’s how:
- Enter your website URL inside your Merchant Center account.
- Pick a way to verify. You can use:
- Google Tag Manager
- Google Analytics
- An HTML file or tag on your website
Once it’s verified, click “Claim URL.” Done!
⚠️ If your site isn’t verified and claimed, you can’t upload product data or run Shopping ads.
Step 3: Add Business Details
Now it’s time to tell Google about your store.
Fill out:
- Business name
- Address
- Customer service contact info
- Shipping and return policies
This info shows up in your product listings and helps build trust with buyers.
🟢 Bonus Tip: Be clear and honest in your return policy. Google checks this.
Step 4: Connect with Google Ads (Optional but Smart)
Even though it’s optional, linking Google Ads with Merchant Center helps you run shopping ads that get clicks.
Inside your Merchant Center dashboard:
- Click the gear icon
- Choose “Linked accounts”
- Link your Google Ads account
Now you can turn your product listings into Shopping ads that appear right on Google when people search.
📈 This step gives you a huge traffic boost—especially if your products are priced well and your photos look great.
Setting up Google Merchant Center doesn’t take long. But doing it right sets the foundation for your success on Google Shopping.
Want to learn what to do after setup? Next, Google Merchant Center Guide will show you how to upload your products using a product feed—stay tuned.
Create and Upload Your Product Feed
If you’re following this Google Merchant Center Guide for beginners, this is where the real magic starts getting your products into Google.
What Is a Product Feed?
A product feed is like a shopping list for Google. It’s a file that includes everything about your products like the name, price, color, brand, size, and picture.
Google reads this list so it can show your products to shoppers.
Think of it as a menu. If Google doesn’t have the menu, it doesn’t know what you sell.
How to Build a Product Feed
There are three easy ways to create your feed:
1. Manual (for small stores)
You can make a spreadsheet using Google Sheets. Each row is a product. Each column is a detail—like title, price, link, image, brand, and more.
✅ Best for: Beginners or small shops with fewer than 50 products.
2. Spreadsheet Template (Google’s way)
Google gives you a free feed template when you choose to use Google Sheets during the setup. You just fill it in.
✅ Easy, clean, and built to match product data feed requirements.
3. Automatic Feed (for larger stores)
If you use Shopify, WooCommerce, or another platform, many tools and apps help send your product info to Google automatically.
✅ Best for: Medium to large stores with frequent updates.
Tips for Naming and Organizing Your Feed
A clean, organized feed = better chances of showing up in search.
- Use clear titles – Describe the product like a customer would search.
Example: “Red Waterproof Hiking Backpack – 30L” - Be specific – Add brand, size, color, material when possible.
- Use correct categories – Google uses Google Product Categories. Choose the most accurate one.
- Don’t forget GTIN or MPN – If your products have barcodes, include them. Google loves that.
- Images matter – Use high-quality pictures with a white background. No logos or watermarks.
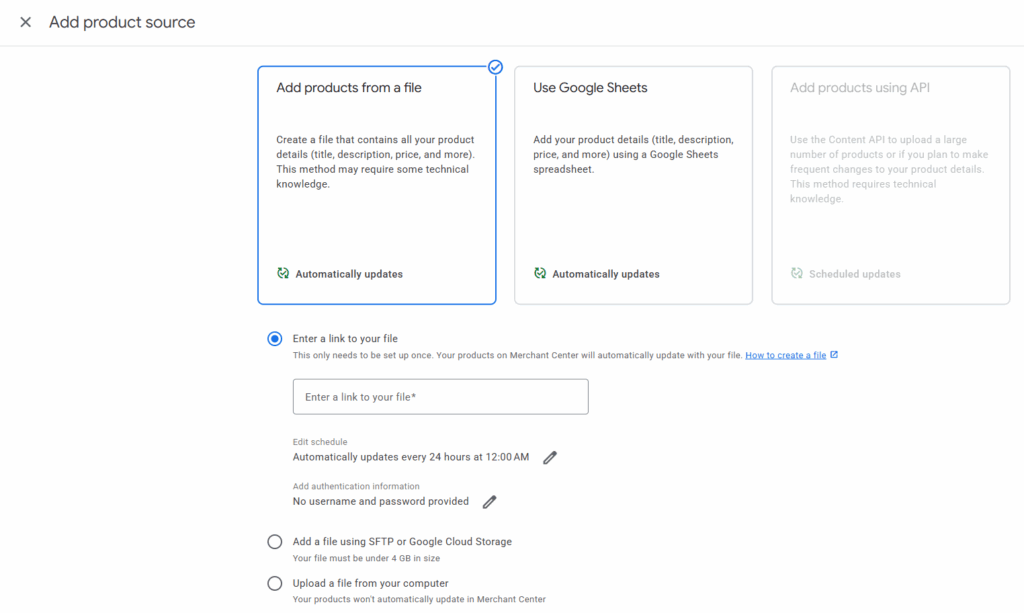
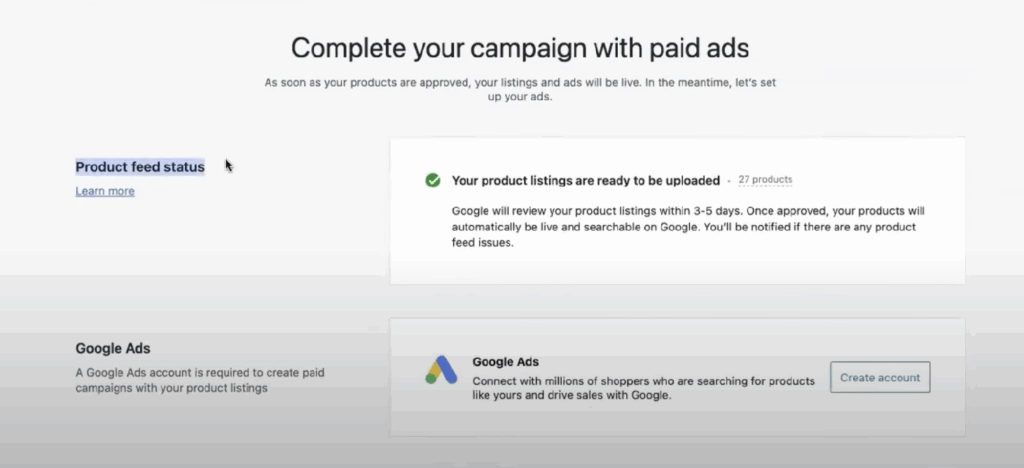
How to Upload Your Feed to Google Merchant Center
Here’s how to send your product feed to Google:
- Go to your Merchant Center account
- In the left menu, click Products > Feeds
- Click + Add Feed
- Choose your country and language
- Pick your input method (Google Sheets, scheduled fetch, or content API)
- Name your feed
- Connect your data source (like your spreadsheet or app)
- Click Create Feed
Done! Google will now review your products. If all looks good, your items will start to appear on Google Shopping.
💡 Pro Tip:
Always check for feed errors. Google will tell you if something is missing or incorrect. Fix it fast to keep your products active.
Understand Google Merchant Center Policies
A key step in every Google Merchant Center tutorial for beginners is understanding the rules.
If your products break the rules, they won’t show up. It’s that simple.
What Rules Must Your Products Follow?
Google wants a safe and fair shopping experience for everyone.
That’s why they have Merchant Center policies. These rules tell you what you can and can’t list.
Here’s what your products must have:
- Honest titles, clear descriptions, and real prices
- Real product images with no logos or watermarks
- A return policy and contact info on your website
- No illegal, fake, or misleading products
If you don’t follow these rules, Google may disapprove your items or even suspend your account.
❌ Examples of Common Policy Violations
Let’s look at what not to do—mistakes beginners often make:
1. Wrong or misleading titles
Example: Naming a used item “Brand New iPhone”
💡 Tip: Be honest and specific.
2. Low-quality or edited product images
Don’t use images with text overlays, logos, or blurred backgrounds.
3. Missing product info
For example, if you’re selling shoes but forget to list the size or brand, Google may flag it.
4. Prohibited items
Items like weapons, fake goods, or tobacco are not allowed.
5. Mismatch between your site and your feed
If your product says $20 in your feed but $25 on your website, Google may disapprove it.
How to Stay Compliant (And Keep Products Approved)
Here’s how to play it safe and stay on Google’s good side:
- Use clear titles and clean images
Example: “Men’s Waterproof Running Shoes – Size 10 – Black” - Follow Google’s product data feed rules
Every detail matters: size, color, price, availability, brand, etc. - Review Google’s policy pages often
Visit the Google Merchant Center Policy Page for updates. - Fix issues fast
If you see disapproved items in your account, go to Products > Diagnostics to view and correct the problems. - Don’t guess — always verify
Use tools like the Feed Rules section in Merchant Center to help fix product info.
💡 Smart Tip for Beginners:
Always check your feed for errors after uploading. This helps you catch issues early, avoid disapprovals, and keep your shopping ads running smoothly.
Remember: Following the rules helps your products show up more often and builds trust with Google. Stick to the policies, and your online store will grow faster and easier.
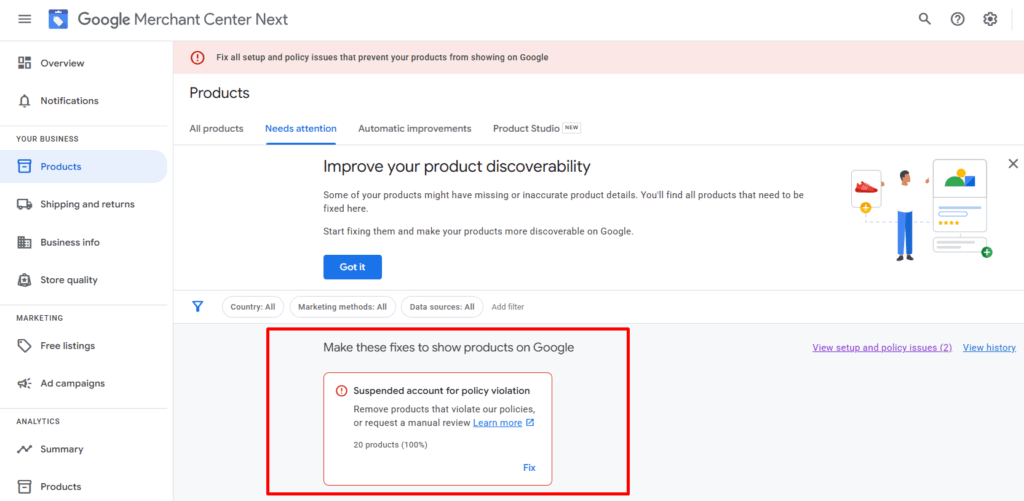
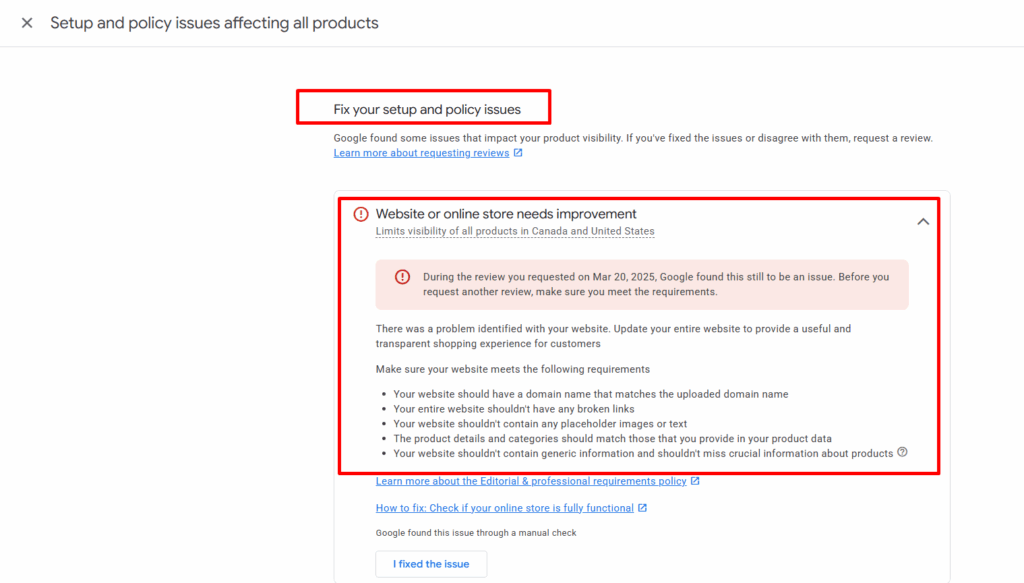
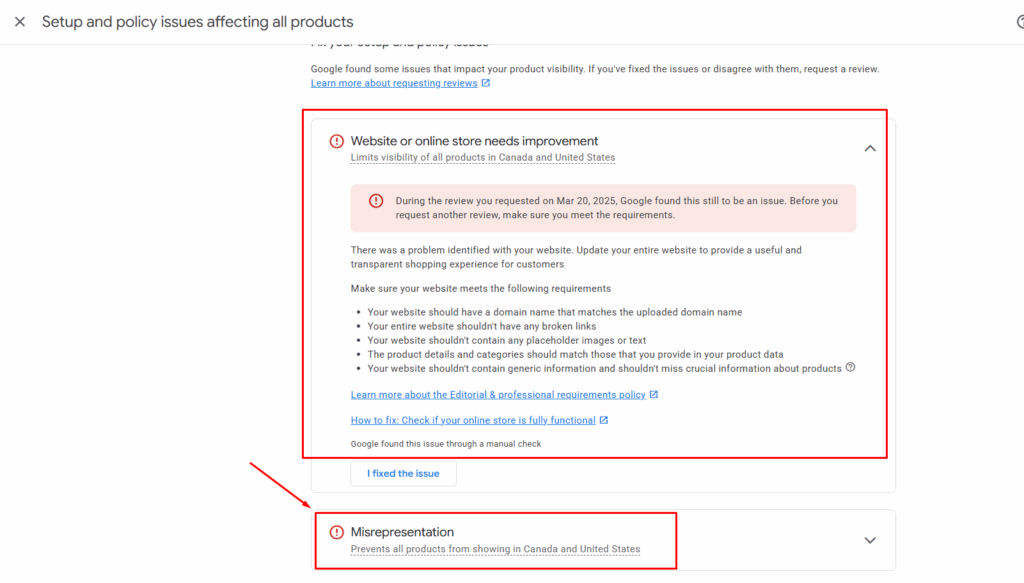
Avoid Account Suspension: Understanding Google Merchant Center Misrepresentation
1. What Is Misrepresentation?
- Simple explanation: Misrepresentation means you’re not being fully honest or clear about your business, product, or website.
- It’s one of the main reasons Google will suspend your Merchant Center account.
2. Common Types of Misrepresentation
Use real-world examples and simple explanations:
- Missing or unclear return/refund policy
- Fake discounts or misleading pricing
- Selling restricted or prohibited items
- Website shows low trust signals (no contact info, no HTTPS, etc.)
- Inaccurate product data (wrong condition, pricing mismatch, fake brands)
3. How to Avoid Misrepresentation
- Always display a clear return and refund policy
- Make sure product titles, images, and prices match exactly with your site
- Use accurate shipping and tax info
- Provide valid business contact details (email, phone, address)
- Do not hide fees or inflate discounts
- Use SSL (HTTPS) to secure your site
4. What Happens If You Violate This Policy?
- Your account may be suspended immediately
- All your Shopping ads will stop showing
- You’ll get a warning email with a short window to fix the issue
5. How to Fix and Request a Review
- Go to Account Issues > Policy violations
- Follow Google’s instructions to fix the problems
- Once corrected, click “Request Review” and wait for feedback (usually 3-5 days)
Bonus Tip for Beginners:
Always look at your store like a shopper. Ask: “Would I trust this site with my credit card?” If not, fix it before uploading products.
Fix Common Errors and Disapproved Products
What Happens When Your Product Gets Rejected?
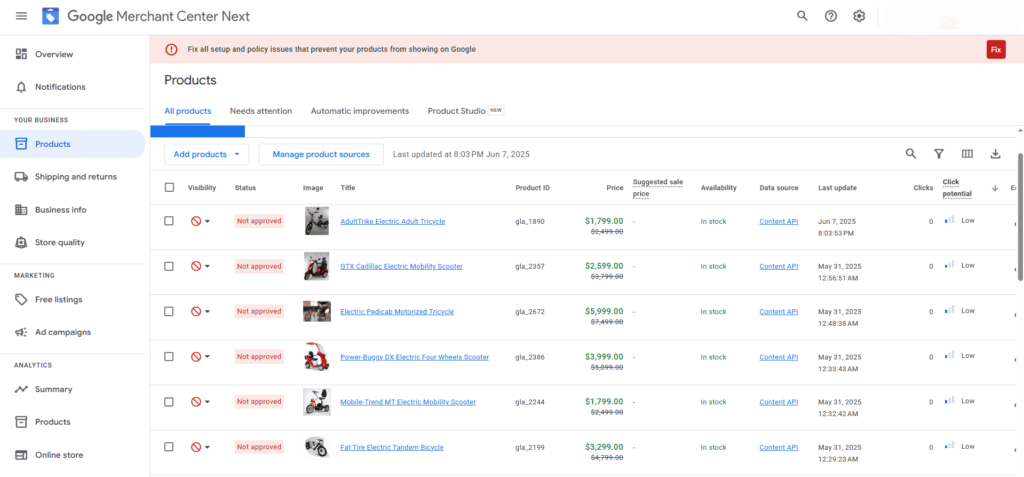
If your product doesn’t show up in Google Shopping, it might be disapproved.
This means Google found a problem with your product info. It can stop your ad from running.
Disapprovals happen when your data doesn’t match Google’s rules. That includes things like:
- Wrong prices
- Poor image quality
- Missing details
- Mismatched landing page info
Google wants shoppers to see trustworthy, clear, and helpful listings, so it checks every product.
Common signs of disapproval:
- Your product isn’t getting impressions or clicks.
- You see a red “Disapproved” label.
- You receive an email from Google Merchant Center.
👉 Don’t worry. Most errors are easy to fix if you follow the right steps.
How to Find and Fix Errors
You don’t need to guess. Google shows you exactly what went wrong.
Here’s how to find the errors:
- Sign in to your Google Merchant Center account.
- Click Products > Diagnostics from the left menu.
There you’ll see:
- Errors: These are serious problems. Your product won’t show until you fix them.
- Warnings: These don’t stop ads, but they can hurt performance.
- Suggestions: Helpful tips to improve listings.
Fixing the Most Common Errors:
| Error Type | How to Fix It |
| Missing product title or description | Add clear, honest product info |
| Price mismatch | Make sure your product price matches what’s on your website |
| Invalid image URL | Use a direct, high-quality image link without watermarks |
| Unsupported language | Use your local language (like English) in your feed |
| Item out of stock | Mark it correctly or remove it until back in stock |
Use Google’s Product Data Specification as a guide to avoid issues:
👉 Product Feed Requirements
How to Appeal or Request a Review
Once you fix a problem, you need to let Google know. Follow these simple steps:
- Go to the Products tab in Merchant Center.
- Find the disapproved item.
- Click “Request Review”.
Google will recheck your product, usually within 24–48 hours.
If your product meets all rules, it will be approved and appear in shopping ads again.
✅ Note: Don’t keep requesting reviews without fixing the problem. Too many failed requests can pause your account.
How to Prevent Future Issues
Here’s how to avoid more errors and disapprovals:
- Use real, correct product data. Don’t exaggerate.
- Match your product info to your website. Titles, prices, and availability must match.
- Use high-quality images. No logos or watermarks on top.
- Update your feed regularly. Especially for price or stock changes.
- Check the Diagnostics tab weekly. Catch small problems early.
Google is strict—but fair. If you play by the rules, your products will keep showing.
Quick Tip for Beginners (Google Merchant Center Guide)
“Why aren’t my products showing?”
It’s one of the most common questions in Google Merchant Center tutorials for beginners.
Answer: Check the Diagnostics tab. It tells you the exact reason and how to fix it. Don’t waste time guessing—let Google show you the way.
Optimize Your Feed for Better Results
Making your product feed better helps your items show up more in Google Shopping. This is called feed optimization.
If your titles, descriptions, and product details are strong, more people will see and click your ads.
Let’s go over the best ways to make your feed better.
Use Good Titles and Descriptions
Your product title is the first thing shoppers see. Make it clear and simple.
Tips:
- Put the most important info first. Example: brand, model, type.
- Don’t use all caps or extra symbols like “!!!”.
- Keep it under 150 characters (Google may cut longer ones).
✅ Example:
- Good: Nike Men’s Running Shoes – Air Zoom Pegasus 38
- Bad: WOW!!! AMAZING DEAL!!! BEST SHOES EVER!!
Your description tells people more. Use normal words to explain what the item is, what it does, and who it’s for.
Mention key features like size, color, and use.
Add Product Categories and Tags
Google needs to know what you’re selling so it can show it to the right people.
Use Google’s product category list to label your items correctly. The category should match your product exactly.
✅ Example Categories:
- Apparel & Accessories > Shoes > Athletic Shoes
- Electronics > Computers > Laptops
Also, add custom labels or tags to group your products. For example:
- “On Sale”
- “Best Seller”
- “New Arrival”
These help with better sorting and ad targeting later.
Include Rich Product Data (GTIN, Brand, MPN)
This is a big part of merchant center feed optimization.
Adding extra product info helps Google understand your item better and match it with searches.
Important Data Fields to Include:
- Brand: Like Nike, Samsung, or Lego
- GTIN (Global Trade Item Number): It’s like a barcode for your product
- MPN (Manufacturer Part Number): A unique number from the maker
Google uses this data to compare your product with others.
If it’s missing or wrong, your listing might be less visible.
Keep Your Feed Updated
This is one of the most important Google Merchant Center best practices.
Google wants your feed to always show accurate info. If something changes—like price or stock—you need to update your feed fast.
Tips:
- Use auto-updates with your website (if you can).
- If you upload by spreadsheet, check and refresh it at least once a week.
- Make sure the price and availability match your site. If not, you may get disapproved.
💡 Final Tip for Beginners
In Google Merchant Center tutorials for beginners, feed optimization is a key step to doing well.
“Think of your product feed like a menu. If it’s clean, clear, and helpful, people will want to order.”
Great product data helps your ads get shown more often—and to the right shoppers.
Connect Google Ads with Merchant Center
If you want people to see your products when they search on Google, you need to connect your Google Merchant Center account to Google Ads.
This is how you create and run Shopping Ads.
Let’s break it down in a simple way.
Why Linking Is Helpful for Visibility
When you link Google Ads with Merchant Center, your product feed can be used in ads. These ads show up on Google Search, Shopping, YouTube, and even Gmail.
It helps your products get seen by people who are ready to buy. That means more views, more clicks, and more sales.
This step is a must if you’re following Google Merchant Center Guide for beginners.
Without it, your products won’t appear in shopping ads.
How to Link Your Accounts
Linking is super easy. Just follow these steps:
- Go to Merchant Center
Log into your Merchant Center account. - Click the Gear Icon
In the top right, click on the gear icon and choose Linked Accounts. - Find Google Ads
You’ll see an option to connect your Google Ads account. - Send a Request
Click Link next to your Google Ads account. Then approve the request inside your Google Ads account.
Now they’re linked!
Create Your First Shopping Campaign
Now go to Google Ads and click New Campaign.


Choose:
- Goal: Sales or Website Traffic
- Campaign Type: Shopping
- Choose your linked Merchant Center account
- Select your country
- Name your campaign
Boom! You’re ready to go.
Set a Small Daily Budget to Start
You don’t need a lot of money to begin. A good starting budget is around $5 to $10 per day. This helps you test what works without spending too much.
As you get more data, you can raise your budget for better results.
Final Tip:
Linking your accounts is a key step in every Google Merchant Center Guide for beginners. It lets your products reach more people, and it sets the stage for your first shopping ads.
Next up, we’ll talk about how to track results and improve your ad performance.
Best Practices for Shopping Ad Performance
Want your products to stand out in Google Shopping? Then you need to follow a few best practices that really work. This section shows you how to write better titles, use sharp images, and keep your campaigns in top shape. Let’s go!
Write Better Product Titles
Your product title is the first thing shoppers see. A weak title gets skipped. A good one gets clicks!
Do this instead:
- Put the most important info first (brand, type, color)
- Use clear words people search for
- Avoid extra fluff or salesy terms
Example:
Bad: “Amazing New Stylish Sneakers 2024!”
Good: “Nike Air Max Men’s Running Shoes – Black Size 10”
Why it matters: Google matches your product to searches using your title. Better title = better match = more sales.
Use High-Quality Images
Shoppers are visual. Blurry or dark images chase them away.
Tips:
- Use clean, white backgrounds
- Show only the product—no logos, watermarks, or text
- Use high resolution (at least 800×800 pixels)
Why it matters: Great images grab attention and improve click-through rates.
Offer Good Prices and Shipping
People compare before they buy. If your price is too high or your shipping is too slow, they’ll pick someone else.
Do this:
- Offer competitive prices
- Include free or low-cost shipping if possible
- Show clear delivery times
Why it matters: Better value means better conversions.
Monitor Your Campaigns Weekly
Don’t set and forget. Keep checking your:
- Clicks
- Costs
- Conversions
- Errors
Use:
- Google Ads to track performance
- Merchant Center > Diagnostics to spot issues
Fix problems fast and try new ideas to improve results.
Quick Tip:
Keep a simple checklist. Every week, ask:
- Are my prices still good?
- Are my products approved?
- Is my ad getting clicks?
Track and Improve Shopping Ad Performance
Once your Shopping Ads are live, the real work begins—tracking and improving performance. As a beginner, you want to know what’s working, what’s not, and how to make your ads better.
This section will show you exactly how to do that in a simple, clear way.
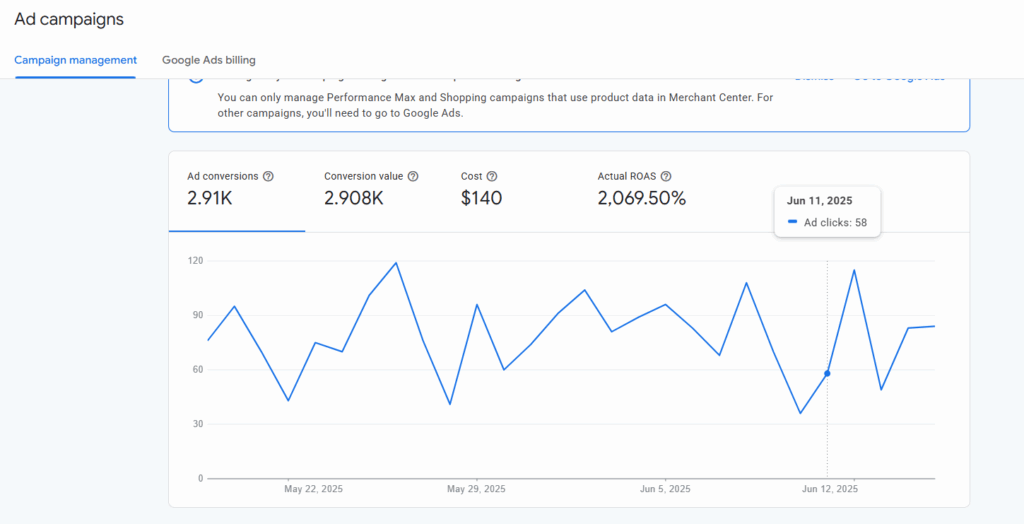
Why Tracking Matters
Running ads without tracking is like driving with your eyes closed. You need to know:
- Are people clicking your products?
- Are they buying?
- Which products get the most attention?
When you follow Google Merchant Center tutorials for beginners, tracking helps you make smart changes that boost results and lower your ad costs.
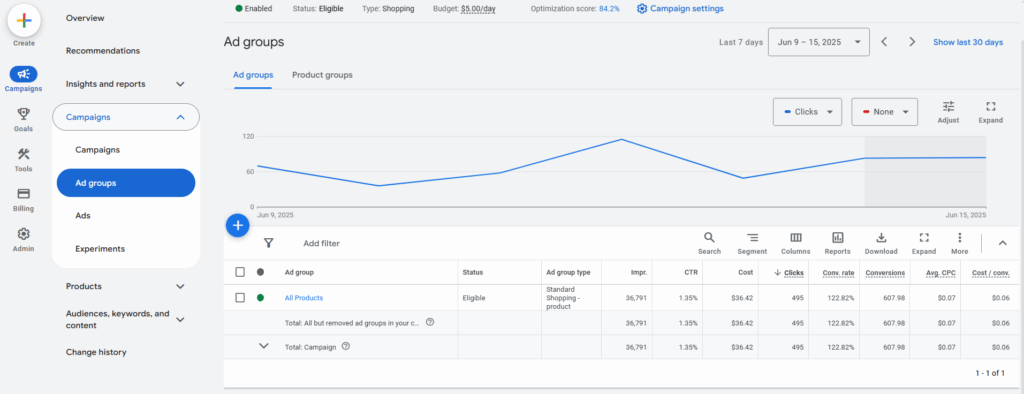
Use Google Ads Reports
Go to your Google Ads account and open your Shopping campaign.
Here’s what to look at:
- Impressions – How many times your product showed
- Clicks – How many people clicked on your ad
- CTR (Click-Through Rate) – How often people click after seeing your ad
- Conversions – How many actually bought something
- Cost per conversion – How much each sale costs you
These numbers tell the story of your ad’s success.
Use Merchant Center Diagnostics
In your Google Merchant Center, go to:
Products > Diagnostics
This shows if any of your products have:
- Missing info (like price or brand)
- Disapprovals
- Policy violations
Fixing these helps improve your product visibility and click quality.
Ways to Improve Ad Performance
Here are simple ways to get better results:
- Use clear product titles (include color, size, and brand)
- Write honest and short descriptions
- Upload high-quality images with white backgrounds
- Add GTIN, brand, and MPN (Google likes full data)
- Organize your products into custom labels (like bestsellers or on sale)
- Use negative keywords in Google Ads to stop wasting money on bad searches
Test, Learn, and Repeat
Keep testing different product titles, images, or prices.
Example: If one product gets lots of clicks but no sales, try changing its photo or lowering the price.
The goal? Get more sales without raising your budget.
Smart Tip for Beginners:
Check your ad performance weekly. Make small changes, and watch what happens. The more you learn, the better your ads will get.
Troubleshooting: Why Your Merchant Center Products Aren’t Showing
So you’ve set everything up, uploaded your feed, and launched your campaign… but your products still aren’t showing on Google Shopping?
Don’t worry.
This happens to a lot of beginners. Let’s walk through why this happens, how to fix it, and what to do next.
Common Causes: Errors, Pricing, Shipping, Disapproval
There are a few reasons why your products might be missing:
- Disapproved items: Google may block products that break rules (like missing info, wrong pricing, or misleading images).
- Pricing mismatches: If your price in the feed is different from your landing page, Google won’t show your product.
- Shipping settings: Wrong or unclear shipping info can cause your items to be disapproved.
- Missing product data: If you forget things like GTIN, brand, or condition, Google may not list your product.
Always check the Diagnostics tab inside your Merchant Center. It tells you exactly what’s wrong.
How to Diagnose Quickly
To find the problem fast:
- Go to your Google Merchant Center account.
- Click Products > Diagnostics.
- Review errors, warnings, and disapproved items.
This is your main dashboard for spotting problems. Google will explain what’s missing or incorrect.
Fix and Resubmit Process
Once you’ve found the error:
- Fix the product info in your feed (title, price, image, etc.).
- Re-upload your product feed manually or let your feed auto-update.
- Go back to the product page and click “Request Review”.
Google will usually re-check your product within 24–48 hours. If it passes, it will start showing again.
When to Contact Support
If you’ve fixed everything and your product still doesn’t show after a few days, it’s time to reach out:
- Use the Help icon in Merchant Center.
- Choose Contact Support.
- Explain your issue with screenshots or product IDs.
Google’s support team is helpful—they’ll guide you through advanced issues if needed.
Final Tip for Beginners
Don’t guess. Let Google’s tools guide you. Most problems are easy to fix once you understand what went wrong.
Final Thoughts: Ready to Boost Your Sales?
You’ve just finished reading one of the most helpful Google Merchant Center Guide for beginners.
We hope this guide made everything clear and easy to follow.
Now, it’s time to take action and grow your online business!
Let’s quickly go over what you’ve learned.
Quick Recap: Key Steps We Covered
- What Google Merchant Center is and how it works
- How to set up your account from scratch
- How to create and upload your product feed
- Ways to fix common errors and product disapprovals
- How to connect Merchant Center with Google Ads
- Tips to optimize your product titles, images, and pricing
- How to troubleshoot when your products don’t show
Each step matters. Following them helps your products appear on Google Shopping and reach real buyers.
✅ Checklist Before You Launch
Before you go live, make sure:
✔ Your product feed is complete and accurate
✔ Titles, prices, and images match your website
✔ All disapproved items are fixed
✔ Google Ads is linked with your Merchant Center
✔ You set a daily budget for your first campaign
✔ You check Diagnostics for any last-minute errors
This small checklist can make a big difference!
What’s the Next Step?
If you’re serious about making sales online, don’t wait.
👉 Start uploading your product feed today.
The sooner your products are live, the sooner buyers can see them.
Need Help? Let CustomLiftBD Guide You
At CustomLiftBD, we help small businesses like yours set up, manage, and optimize Google Merchant Center accounts the right way.
💡 Whether you’re just starting or stuck with errors, our team can do it all for you.
✅ Save time
✅ Avoid costly mistakes
✅ Get expert support
📞 Contact us now to get started
📧 Or subscribe to our newsletter for more step-by-step guides and tools
Let’s lift your sales to the next level—the smart way.